How to Make No-Sew Knotted Top from Old T-Shirt

No-Sew Knotted Top

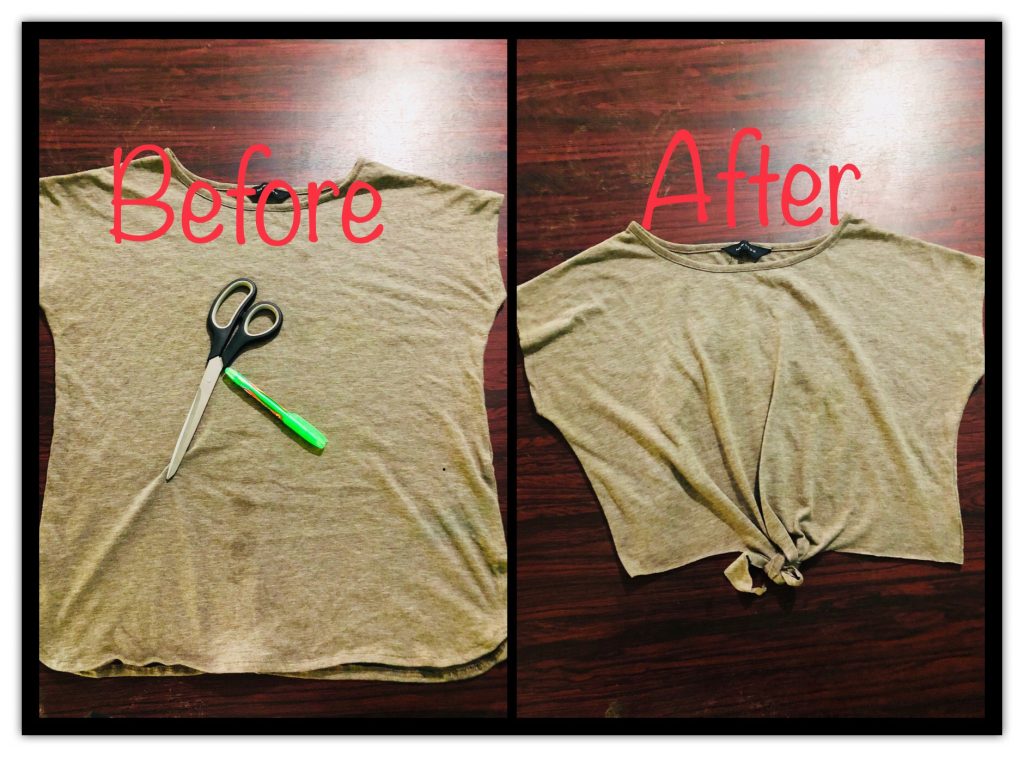
How about your favorite baggy top turn into no-sew Knotted top ? Did you know that giving a simple knot to your top will change its entire look? Knots give a cute look for your outfit. knots are quite famous fashion these days. knotted t-shirt, knotted shirts, knotted skirts see… knots everywhere!

we all have unfitting baggy tops but with the comfortableness, we love to wear them so much. so making your baggy top into knotted top would give you a more chance to wear your favorite top every day. And knotted tops are the best solution for your boring and old tops. No-sew knotted top is one of easiest project you can try at your home. Okay, let’s start then.

what you’ll need?

  • t-shirt
  • scissor
  • marking pen or chalk

knotted top item

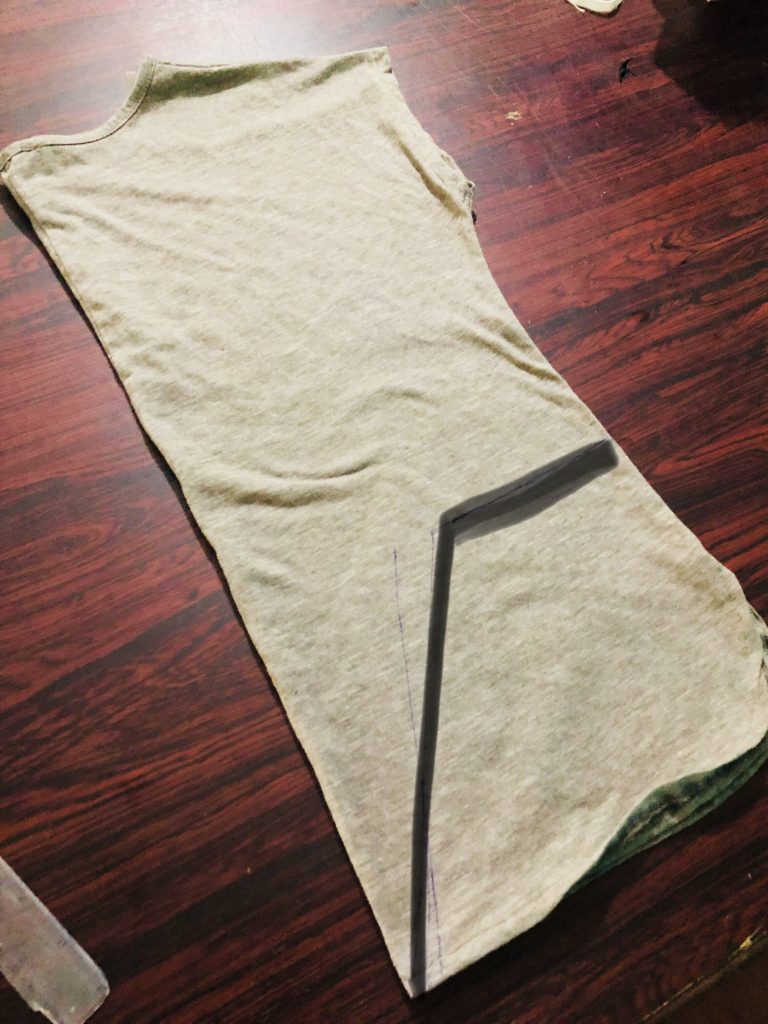
When you are selecting a t-shirt it’s better to select a baggy t-shirt. 1st lay your shirt on a flat surface and fold it into the half.

fold it into half

Next, draw a triangle and cut it. Now as you can see both sides have ties.  what you are gonna do next is lay t-shirt on a flat surface and fold the front side to upward. Next cut out the triangle the fabric of back side. Make sure front piece is facing upward right now because you don’t accidentally cut front triangle as well.

knotted top 3rd step

cut on the triangle

cut it off

Next, cut through the middle of the triangle and just cut upwards. so you just made two ties for your t-shirt. Now take the edges of the ties and stretch it. after that, all you have to do is take the two ends and tie them together. And that’s it!

knotted top step 5

Wear your no-sew knotted top with high waist jeans or shorts and let a little bit of your skin peep out. Also knotted top and ripped jeans would be a perfect match. Try to make your own ripped jeans at home.  If you like more feminine outfit wear this with a long maxi skirt.  Also, you can even wear this as a bathing suit cover-up.

DIY knotted top

Happy DIYing ladies! Try more DIY projects from scissortwists.com.  

How to Make Ripped Jeans for Women in a Quick Way – ScissorTwists

ripped jeans
Ripped Jeans Image Source: Google


We all love ripped jeans but have you ever think how to make it? If you know the history of ripped jeans I’m sure you’ll be surprised. Have you heard that ripped jeans started out as a result of over wear and working? But by the 80s, when fashion becomes a trend and it got a lot more attention from the young generation. Results were this remain consistent fashion since the 80s. With the high demand ripped jeans has become too expensive. Do you know that you can do the same at home? Yeah, it’s possible and it will only take few minutes. So why would you waste a ton of money on those when you can exactly do the same at home.  Okay then, let’s get started. There are many methods that you can use. Time is the easier way to make these kinds of fashions but it takes more time than we expected. But using different objects you can make it and recreate its look.

You’ll need:

  • A pair of old or new jeans
  • Scissors
  • Tweezers /sandpaper/ razor (your choice)
  • Marker


How to Make Ripped Jeans with TWEEZERS 

Mark lines where you want to distress. You can draw any length you want.  Now cut out the lines you just drew. Always make small cuts. Because it’s easier to pull out treads.

tweezers ripped
Making Ripped Jeans with Tweezers

For this method, you are basically removing all the blue treads and keeping all the white. Using a tweezer pull out all the blue threads. This is bit hard first but, it does get easier as you go along. Tips: use pointy tweezers they are really easy to pull out treads rather than big one. Repeat the same process.

tweezers ripped
Using a tweezer pull out all the blue threads and keep all the white treads

Ripped Jeans with SANDPAPER

All you have to do is rub sandpaper against your jeans. As you can see in the picture your jeans begin to distress. It is important to use different size of paper for different sizes. For example, if you don’t want too much distress on your jeans use small sandpaper. Using this method you can easily make these jeans but you have to careful because if it becomes too much distress than you need you can’t go back.

sandpaper ripped
Ripped Jeans using Sand Paper
sandpaper ripped
Sandpaper Ripped Jeans

Ripped Jeans with RAZOR

Please be careful if you are using this method. using a razor to make ripped jeans is dangerous but still, people use it because it gives different look than other methods.  Grab the razor on the place where you need to distress.  Repeat the process until you get what in your mind. This method will take little bit longer time than other methods.

Each of the methods is super easy to do but it does take some time and can get bit messy. So make sure you take enough time to finish it. Also, each of this method will give different look so that you can select one method to make ripped jeans otherwise your jeans become more of a messy look.  This is how it ends up with the bunch of cutting and tweezing.  I really hope this article helped you. Check my personal DIV blog scissortwists.com for more DIY projects.